
How to tap a hole by hand
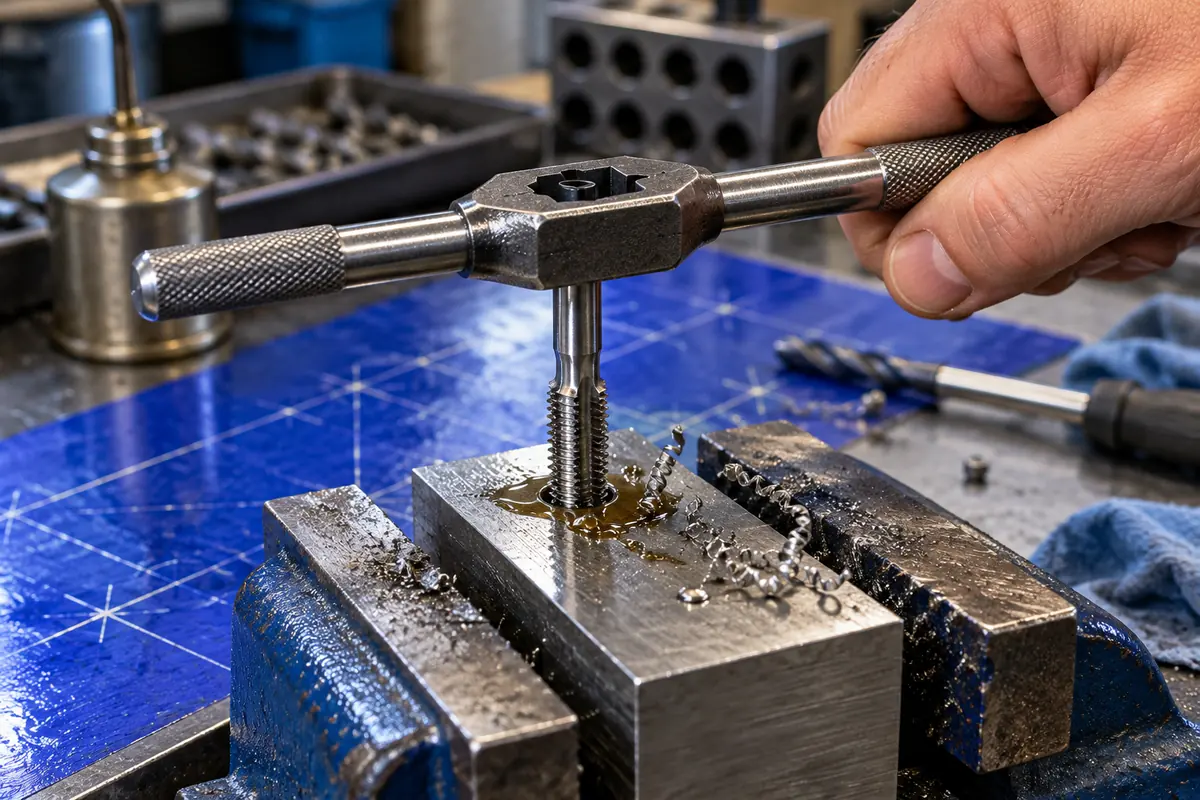
Hand tapping is a short job that goes wrong in predictable ways. The tap is hard and brittle, so most failures come from a crooked start, a hole that is too small, or chips packed into the flutes. This guide goes through the routine in order, with the numbers you need at each step.
What you need
A tap in the thread you want, a tap wrench that fits its square end, and the matching tap drill. Add a center punch, a countersink or larger drill for chamfering, and a cutting fluid suited to the metal. A drill press makes the job far easier because it drills the hole square and can then guide the tap. For blind holes you will want a bottoming tap as well as the plug tap most sets include.
Small taps up to about 1/4 in go in a T-handle wrench, which keeps your hand close to the tap and gives you feel. Larger taps need a two-handled bar wrench for leverage. Either way, the wrench should grip the square snugly; a loose wrench lets the tap twist off-axis.
1. Pick the drill
The hole has to be smaller than the screw so there is metal left for the tap to form into threads.[1] The standard tap drill leaves about 75% of a full thread, which is the number on most tap packets.[2] Look up your thread on the tap drill size pages or the chart.
In stainless steel and other tough alloys, a slightly larger drill makes the tap much easier to turn. Tapmatic notes that such materials can be tapped to as little as 50% of full thread without losing usefulness.[3] The trade-off, covered in the thread percentage guide, is that a very large hole can fall outside the class 2B limits and fail a thread gauge.
2. Lay out and punch
Mark the hole position, then center punch it so the drill starts exactly there.[4] If you have a center drill, spot the hole with it and stop as soon as the countersink part begins to cut.[4] A drop of oil on the punch mark helps the drill start cleanly.[4]
3. Drill straight
A tap follows the hole. A leaning hole gives a leaning thread, with the tap pushed sideways all the way down. MIT's machine shop notes that tap holes very often do not end up perpendicular to the part.[5] On a drill press, hold the part in a drill vise. The Wenatchee Valley College machining text adds a detail people miss: clamp the part in the vise, but do not clamp the vise to the table, so it can float to the spindle.[4]
Drill through or to depth, then clear the chips and wipe the hole out. A hole full of drilling chips will feed them straight into the tap.
4. Chamfer the hole
Run a countersink lightly into the top of the hole so the edge is a little wider than the thread will be. Without a chamfer, the first thread is a thin, ragged lip that can lift or tear; MSC Industrial's guidance is that chamfering gives a stronger thread of better quality.[6] One machining text suggests a slow spindle, between 150 and 250 rpm, for the chamfer.[7] A chamfer also gives the tap a seat to start in.
5. Start the tap square
This is the step that decides whether the job goes well. Start with a taper or plug tap, never a bottoming tap: the bottoming tap's short lead cannot start in an unthreaded hole.[8]
The most reliable way to start square is to leave the part in the drill press after drilling and use the spindle as a guide. MIT's shop describes using the press this way to keep the tap perpendicular.[5] A spring-loaded tap guide in the chuck does the same job: it presses into the center hole in the back of the tap while you turn the wrench.[9] Without a press, a squaring block or a 90° tap guide helps. One machining text puts it plainly: a 90° tap guide is much more accurate than the human eye.[7]
Turn the tap with gentle downward pressure until it bites and feeds itself, usually within one or two turns. Then stop pushing. From here the thread pulls the tap in.
6. Cut and back off
A cutting tap makes chips, and those chips have to break off and fall into the flutes. Backing the tap off now and then breaks the chip so it does not crowd the tap and snap it.[8] Sources disagree on the rhythm. One machining text calls a full turn forward and a half turn back common practice.[7] Make: magazine suggests backing off half a turn for every turn forward in thick material.[10] Treat these as starting points. In free-cutting brass you can go further between reversals; in stainless or gummy aluminum, back off more often.
Feel matters more than the count. When the tap starts to tighten, back it off before you add force. A sudden rise in effort usually means chips are packing or the tap has reached the bottom.
Every time the tap comes out, clear the chips and re-oil.[7] For through holes, run the tap until its full-diameter threads have passed completely through the part.
7. Blind holes
A blind hole has a bottom, and the bottom is where taps break. Drill deeper than the thread you need so there is room for the tap's tapered lead and for chips; the blind hole guide works out how much. Start with the plug tap, clear the chips, then finish with the bottoming tap if the thread must run close to the bottom.
Count turns or mark the tap with tape so you know when you are close. Stop when the tap bottoms. More pressure at that point is likely to break it.[7] Bob Warfield, writing in Cutting Tool Engineering, puts it more bluntly: crashing a tap into the bottom of a blind hole almost certainly will break it, and failing to clear chips is the most common reason taps break in blind holes.[2]
8. Check the thread
For most work, a screw of the right size threading in smoothly by hand is the check. For parts that must meet a thread class, use a thread plug gauge. The go end checks the minimum size and the no-go end the maximum. McMaster-Carr's description: the thread is within tolerance if the go gauge threads in easily and the no-go gauge will not go in more than two turns.[11]
Cutting fluid by material
Fluid reduces friction and heat and helps the chip slide up the flute. The right choice depends on the metal.
| Material | What sources recommend |
|---|---|
| Carbon steel | Petroleum or synthetic cutting oil.[8] |
| Stainless and alloy steel | Cutting oil with about 10% kerosene or mineral spirits,[8] or an extreme-pressure tapping fluid, because stainless work-hardens quickly if the tap rubs instead of cuts.[12] |
| Aluminum | Kerosene or mineral spirits with 15 to 25% cutting oil.[8] A sulfur-free fluid, because aluminum galls badly when sulfur is present.[12] Without lubrication, soft alloys act like chewing gum.[13] |
| Cast iron | Usually dry, with an air blast to clear the powdery chips.[8][12] |
| Brass | Kerosene or mineral spirits.[8] |
| Plastics | Many plastics tap well dry.[5] For acrylic, the maker recommends going slowly with water or a compatible emulsion and using a drill one size larger than the chart.[14] |
Worked example: 1/4-20 in a 3/8 in aluminum plate
The plate is 6061 aluminum, the hole goes through, and the screw is a 1/4-20 cap screw.
- Drill: the 1/4-20 page gives a #7 drill (0.2010 in) for about 75% thread. A 13/64 in bit (0.2031 in) is the substitute if the set has no number drills.
- Spot, then drill on the press with the part in a vise. Clear the chips.
- Chamfer the top of the hole lightly so its edge is just wider than 1/4 in.
- Without moving the part, put a tap guide in the chuck, oil the hole with a sulfur-free fluid and start a plug tap.
- Cut a turn, back off half a turn, and repeat. In 3/8 in of aluminum that is a minute or two of work.
- Run the tap through, clear the chips, and test with the screw.
Why taps break
Most broken taps trace back to a few causes, and all of them are avoidable.
- Crooked start. Xometry, a machining services company, names misalignment as the number one cause of tap problems.[15]
- Hole too small. A hole drilled for more than 75% thread makes the tap work much harder for almost no gain in strength.[2]
- Packed chips. Especially in blind holes, where chips have nowhere to go.[2]
- Hitting bottom. The tap stops, the wrench does not.[2]
- Small sizes. The smaller the tap, the more likely it is to break, so take extra care below #6.[7]
If one does break, the broken tap guide covers the ways to get it out.
Sources
- Intro to Machining 8.12: Tapping (Wenatchee Valley College), LibreTexts
- Seven Ways to Avoid Breaking Taps, Bob Warfield, Cutting Tool Engineering (2022)
- Tapping Torque vs Thread Strength, Tapmatic
- Intro to Machining 8.10: Drilling (Wenatchee Valley College), LibreTexts
- Threading, MIT Machine Shop
- Taking the Cringing Out of Countersinking, MSC Industrial Supply
- Manufacturing Processes 4-5, Unit 5: Tapping (Virasak), LibreTexts
- Tap and die, Wikipedia Cutting fluid table and tap types.
- Spring-Loaded Tap Guide, Tormach
- Skill Set: More on Tapping Skills, Make: magazine
- Thread plug gauges, McMaster-Carr
- FAQ: Tap Magic Cutting Fluids, AIMS Industrial Retailer guidance.
- Tips and Tricks for Threading Aluminum Parts, Cutting Tool Engineering
- Options for tapping acrylic sheet, ACRYLITE (Röhm)
- Common Problems, Causes and Corrections: Taps, Xometry
Found an error? Email [email protected]. Our editorial policy explains how guides are researched and corrected.
 Tap wrench set
 Countersink set